How I Made My Fursuit
How is Soupy Formed
Fursuits are a fun side hobby for me and a way for me to try new crafting techniques. This newest version of Soupy is the 3rd fursuit that I've crafted since I made my first in 2015-- I hadn't made a fursuit since I started crafting for a living with Curlworks that same year, so I was really excited to try my hand again with 5 more years of sewing and crafting experience under my belt!
Folks seemed to really like how he turned out and had lots of questions about how I crafted him, so I wanted to share my experience here. I hope you enjoy!
Materials & Tools
Starting with the materials and tools I used, here's a pretty comprehensive list and some of the reasons that I chose them:
Sculpy/Clay - You can use any clay, just as long as its something easy for you to sculpt! I used clay to sculpt the miniature shape that I used to create the scaled up pattern to transfer to the EVA foam.
EVA Foam - I used 1/2" thick EVA foam "puzzle" floor mats from Harbour Freight, though most hardware stores will carry them. These are much cheaper than EVA foam marketed to cosplayers but made with exactly the same stuff. I decided to go with EVA foam over softer upholstery foam typically used in fursuits
Contact Cement / Barge - This is the glue that was recommended to me to use with EVA foam! It's pretty stinky so you'll want a well ventilated space. I used an old paint brush to brush a thin layer on each EVA foam surface, waited a few minutes for it to dry, and stuck the two surfaces together.
Anti-Pill Plush Fleece - This is the soft thick fleece from Joann Fabrics that I use in most of my products. I used this in lieu of fur. The colors I used are Sugar Coral, Euro Pink, Ivory, and Ice Green.
Fursuit Eye Mesh - I used some black waterproof vinyl mesh for the see-through portion of the eyes. We sell it in our shop, I used the 'Original' style.
Fursuit Eye Plastic - I used JILLCOSTUMES' fursuit eye plastic, available in tons of colors in their Etsy Shop!
Fursuit Whiskers - I used Matrices' fursuit whiskers, available in their Etsy Shop.
Acrylic Paint - I used some various acrylic paints to paint the color onto my eye mesh.
Enamel Model Paint - Most makers use some sort of felt or fabric for the 'eyelash' portion of their fursuit eyes, though I've never been able to work with that cleanly so I decided to paint my eyelashes onto the eye plastic. Testors brand enamel paint, painted on carefully with a brush, worked really well!
Clear Spray Coat - I used Rustoleum 2X Ultra Cover Clear Gloss spray to seal both the eye mesh paint and the enamel paint on the eye plastic.
Heat Gun - A heat gun is essential to tweak and adjust the shape of your EVA foam base once it's all glued together.
Hot Glue Gun & Glue Sticks - I used hot glue to assemble and attach the eyes and to glue down the fleece 'skin' to the EVA foam base.
Brother Scan n' Cut DX - I used my cutting machine to automatically and cleanly cut the fursuit eye shapes out of the fursuit eye plastic. You don't need this though, you can use scissors, a dremmel, etc!
Guides/Inspiration
I recommend checking out these guides and inspirations that helped me, before diving into your project! They'll give a good background into how the techniques I'm going to describe here work.
I was first inspired to try my hand at making a fursuit with eva foam by this twitter thread by Tessa Mag. She was kind enough to share photos of the method she used, which looked really accessible to me as someone who has difficulty with the traditional method of carving fursuit bases out of upholstery foam. She sculpted a scale model out of clay, then used tape to create a flat pattern that she scaled up and then transferred to EVA foam.
Mugiwara Cosplay has several video tutorials outlining this technique that demonstrated the method so helpfully. I recommend checking them out-- this one is my favorite.
Matrices.net is the go-to spot if you're just getting into fursuit making, especially her guides for tape patterns, scale models, and furring, but they're all really useful!
Sculpting the Head Shape
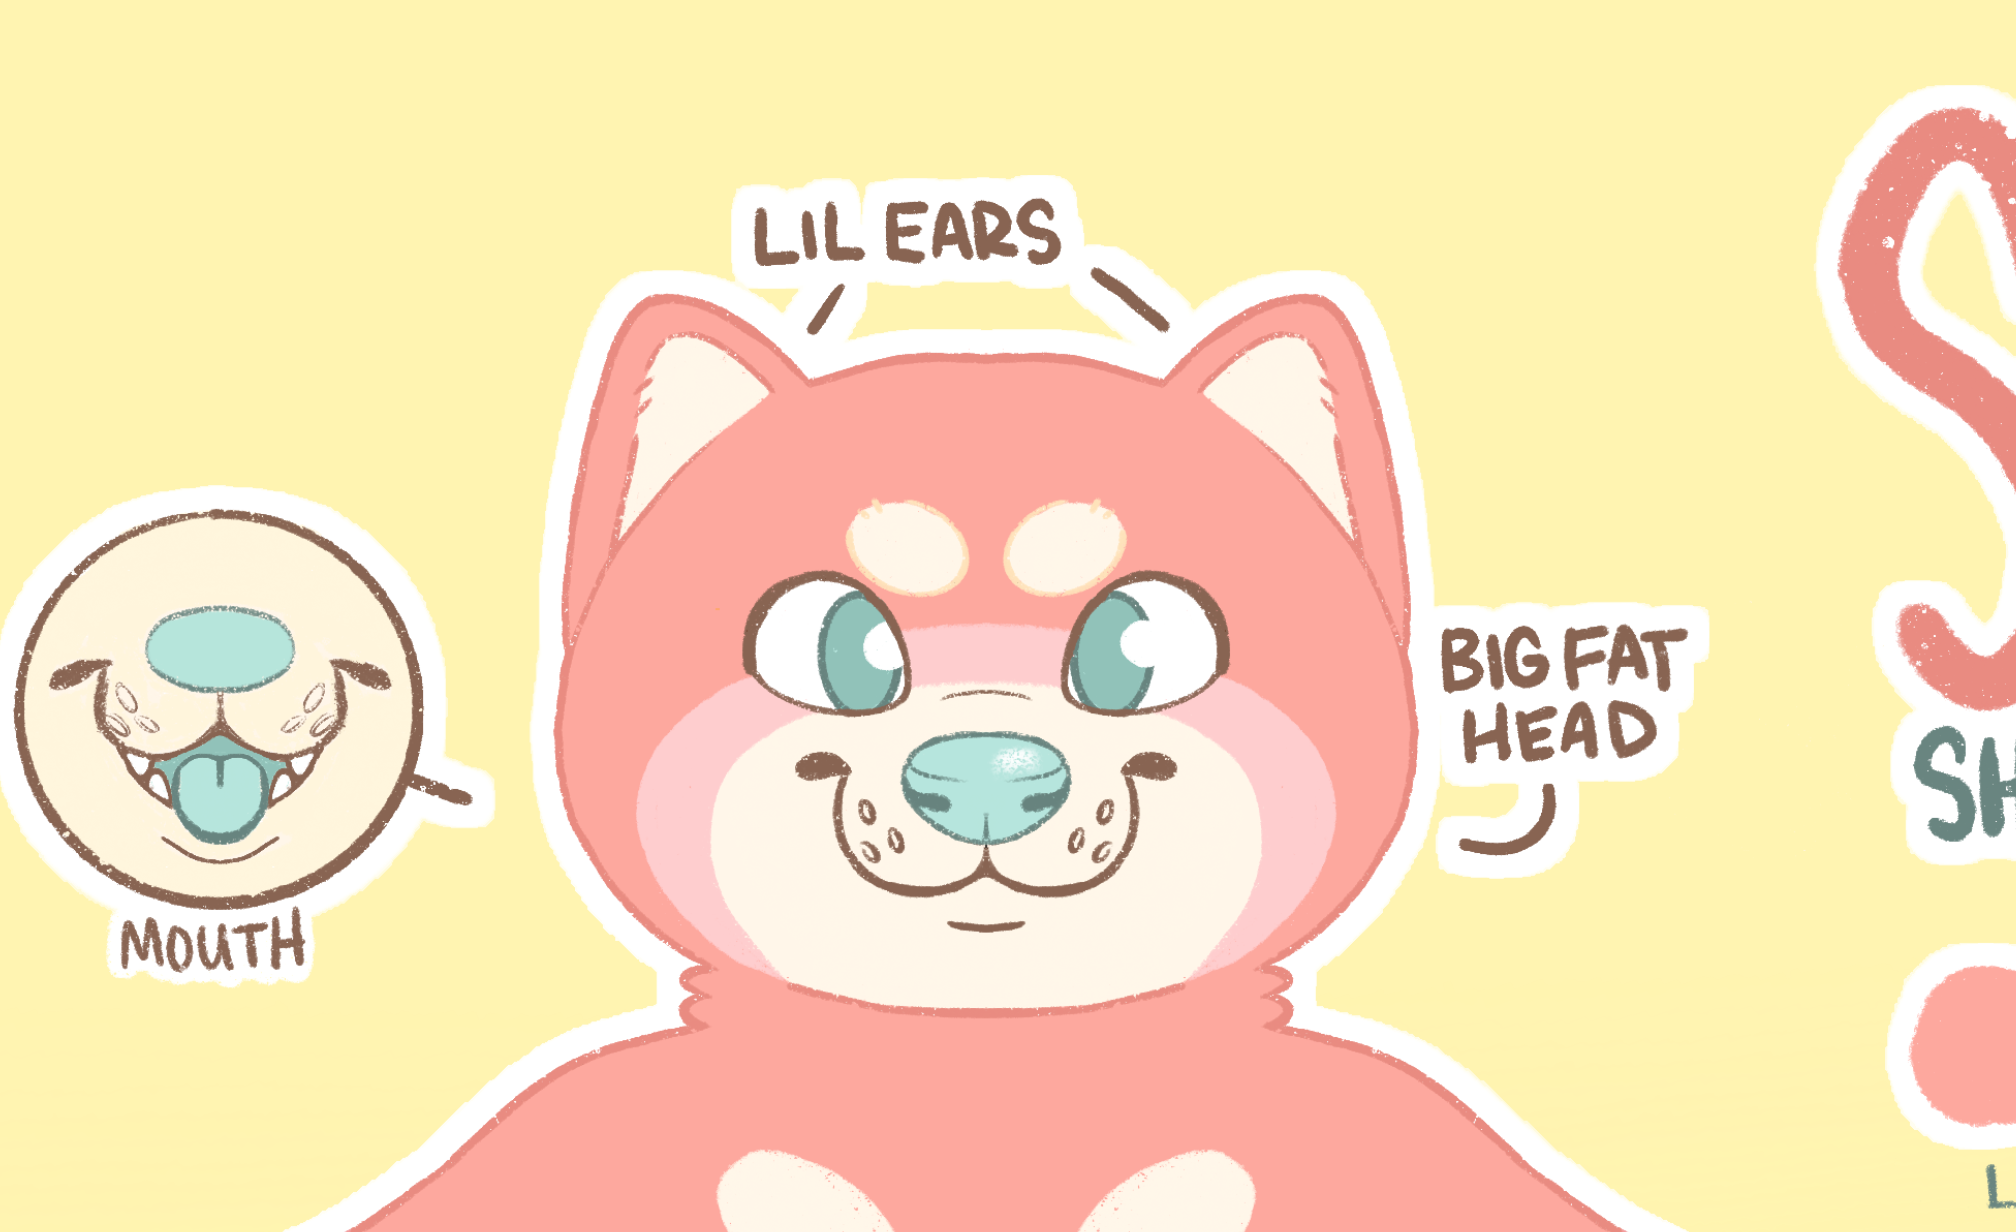
Planning this project, I knew that I wanted a big round WIDE shape with a smaller snout for my Shiba Inu character. I also wanted to incorporate some of the techniques I've developed in my years of making custom kigus and plush fursuit props, so I decided to use the same fleece that I utilize in most of my other work in place of the typical faux fur. My aim was for something soft, plush, and round, with an ultra-cartoony aesthetic.
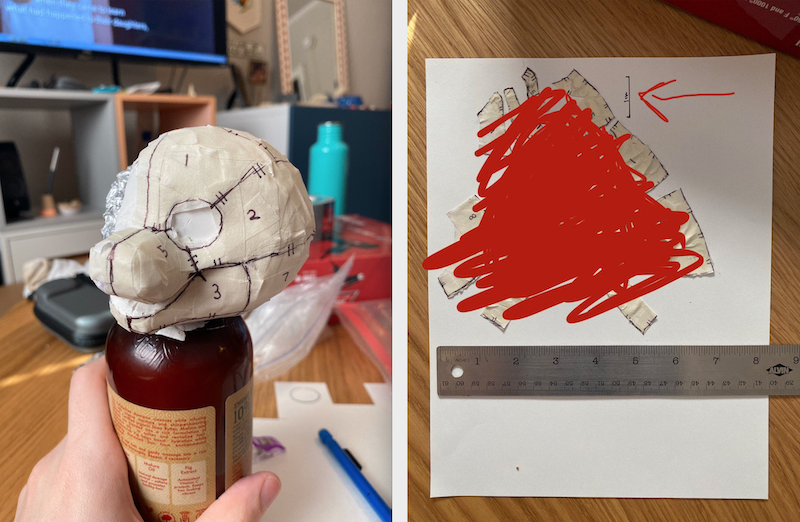
I started by sculpting my doggy head shape with Sculpy on a scale model, about 1/4 the size of the final head base. To hold my sculpt while I worked, I made a quick little mannequin out of tin foil on top of a shampoo bottle. You can order fancier actually-to-scale mannequin heads... but I didn't want to wait to for it to come in the mail. So I eyeballed the general size and made do!
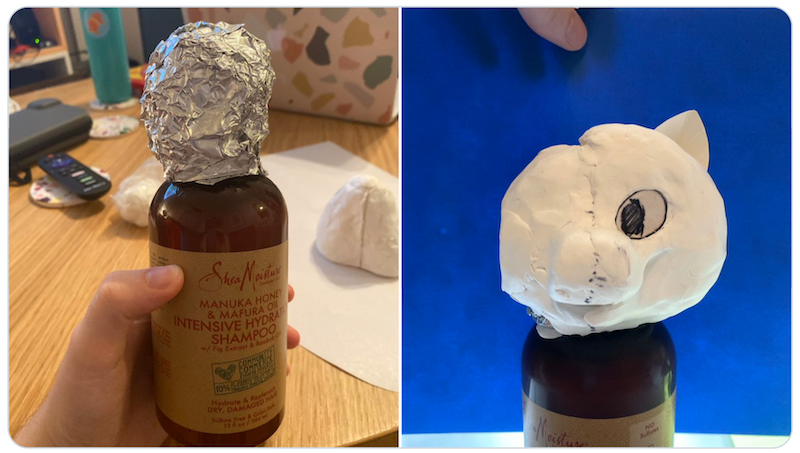
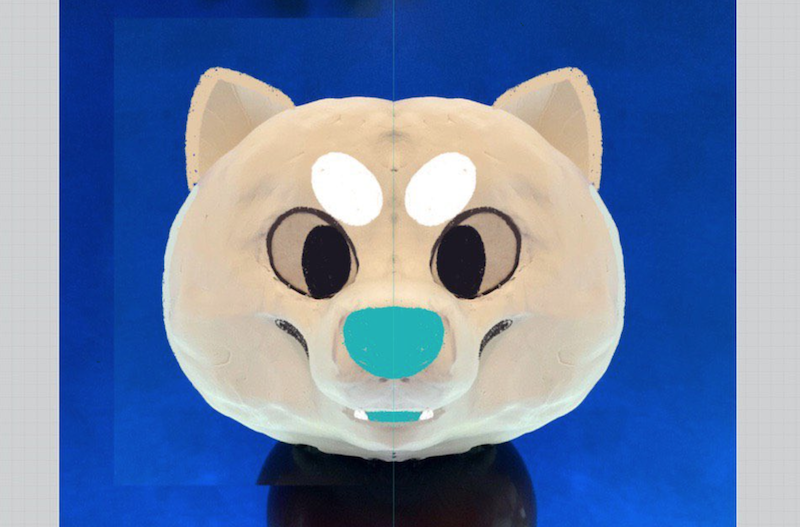
I only needed to really sculpt half of the doggy shape, since I could pattern one half, flip it, and have an entire symmetrical head base. Every so often I'd take a photo of the sculpt from the front and pull it into a photo editing software (I used Procreate on my iPad since I could just take photos with the iPad itself), mirror it, and draw eyes/nose/mouth on top to see how it looked.
From here I needed to get a flat pattern to scale up and transfer to the EVA foam, and if you're familiar with pulling a pattern from a traditional full-sized foam fursuit head, this is the same method, just small! I taped up the 'good' half of the sculpt and drew cut lines along places where I knew I'd need there to be a seam in order for the pattern piece to lay flat. I numbered each piece and put dashed marks along the seams so I could line them up more easily while gluing the foam pieces later. I cut the tape off along the seams with a blade and laid it flat on a piece of paper, darting the pattern where it wasn't quite laying flat.
I then took drew a 1-inch long line on the paper for scale and a photo with my phone. I brought the photo into Adobe Illustrator, scaled up the pattern by about 300% - 400%, printed and cut it out, traced the pieces onto my EVA foam, and cut those out too.
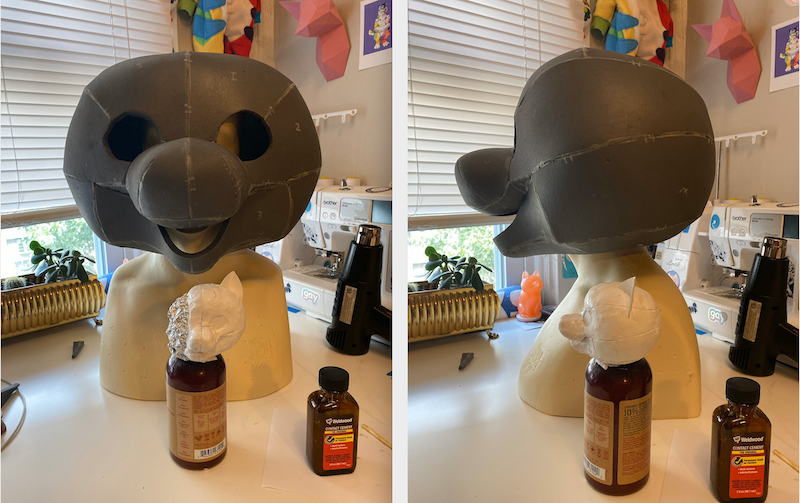
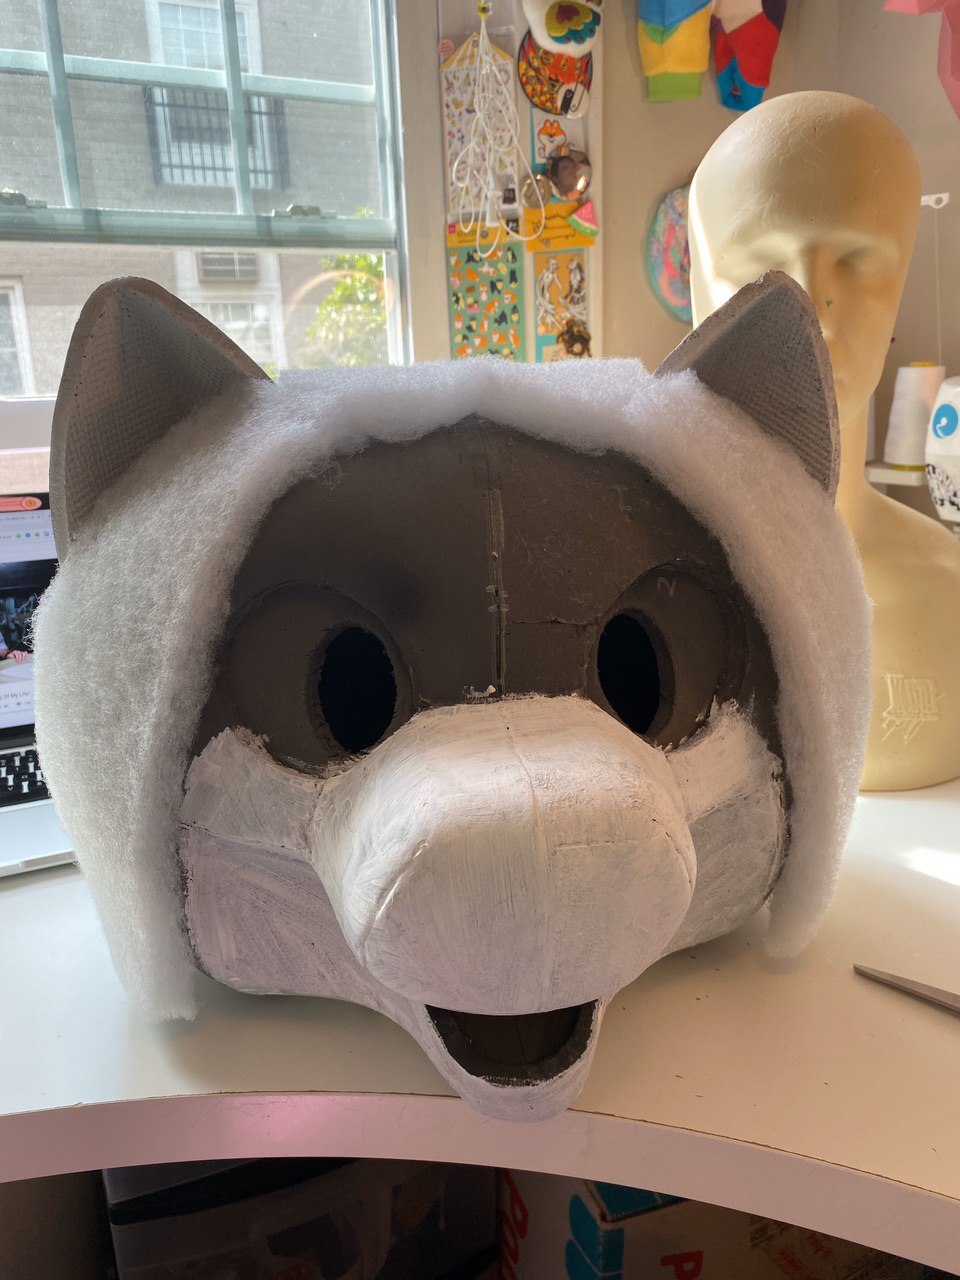
Next I glued together the EVA foam pattern pieces with my contact cement to assemble my fursuit head base. At this stage it looked pretty wonky, so I knew it'd need some shaping with a heat gun!
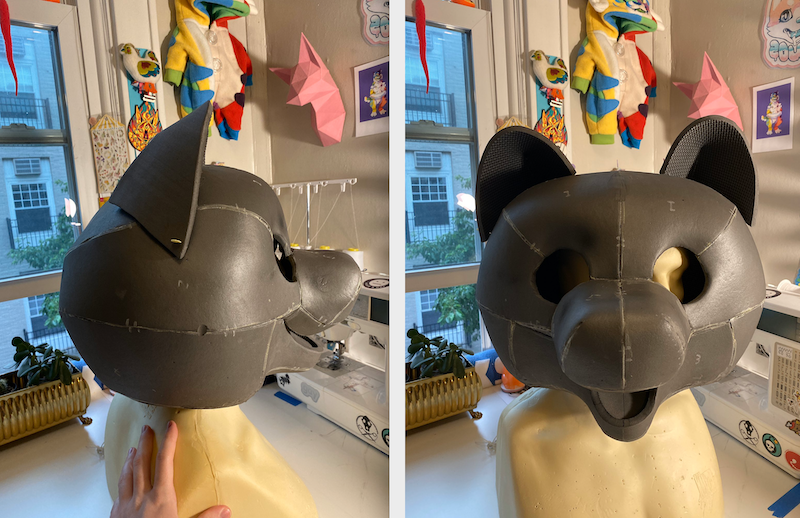
Once the bulk of the head was shaped the way I wanted it to be, I made a few ear shapes out of paper to see what sort of shape and size I'd like to go with, and then transferred that pattern to the EVA foam and crafted the ears from there! I did a little heat sculpting to make them pointier at the top.
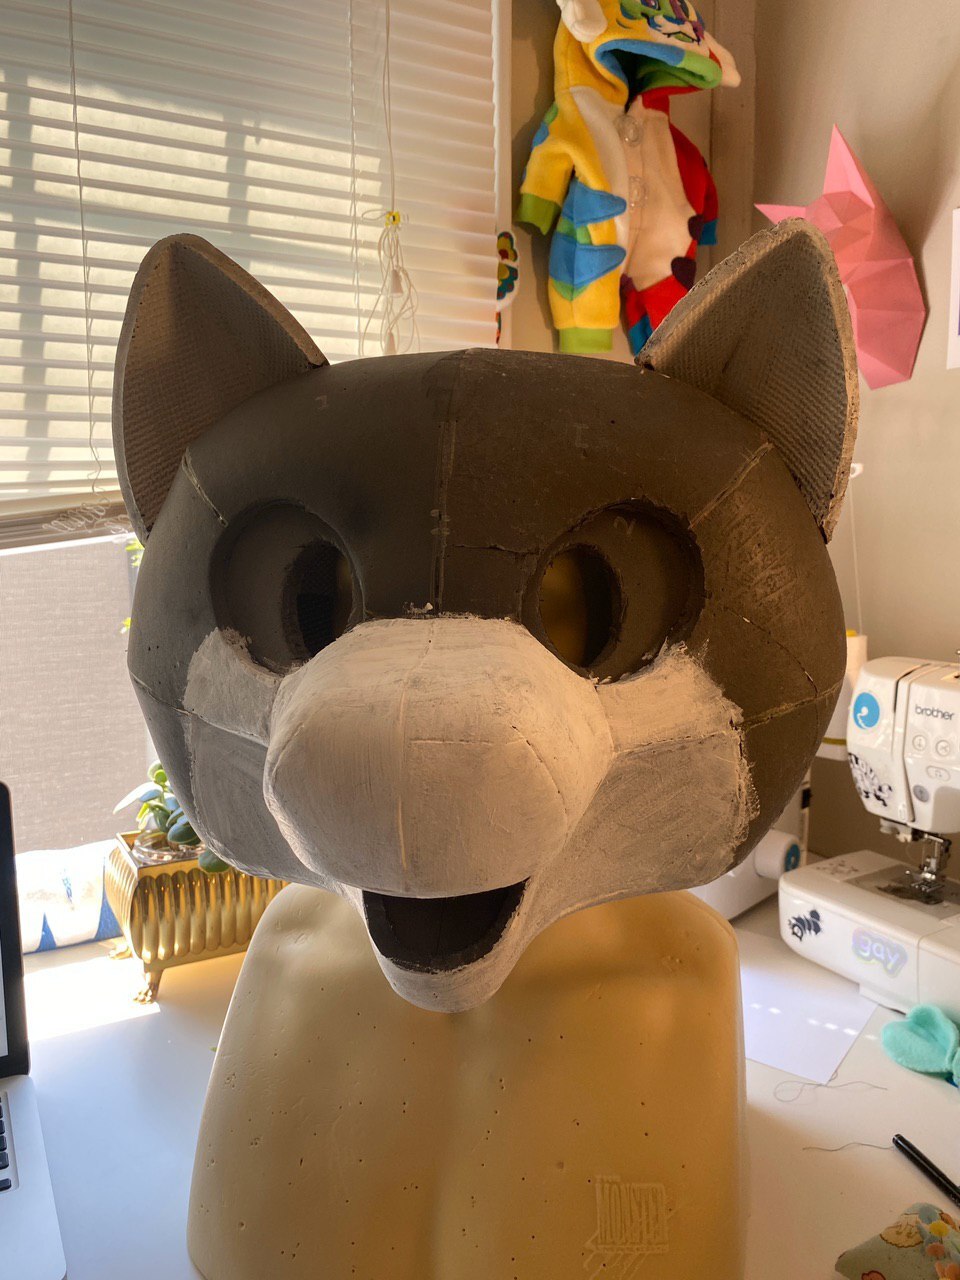
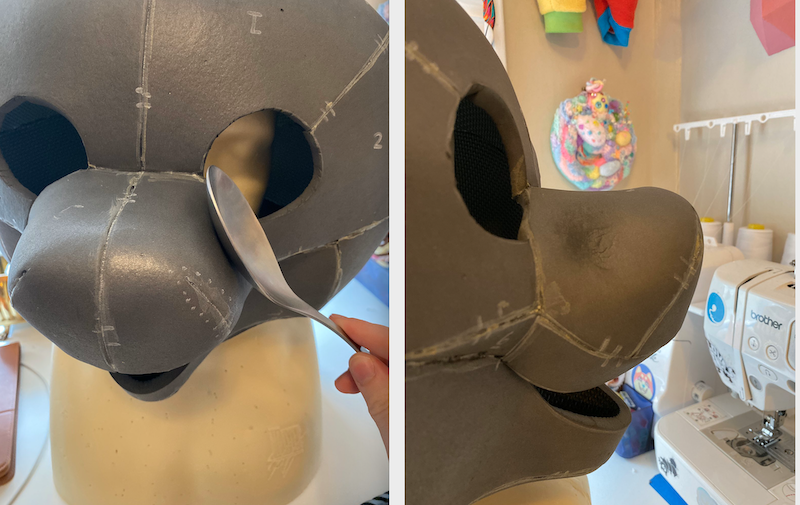
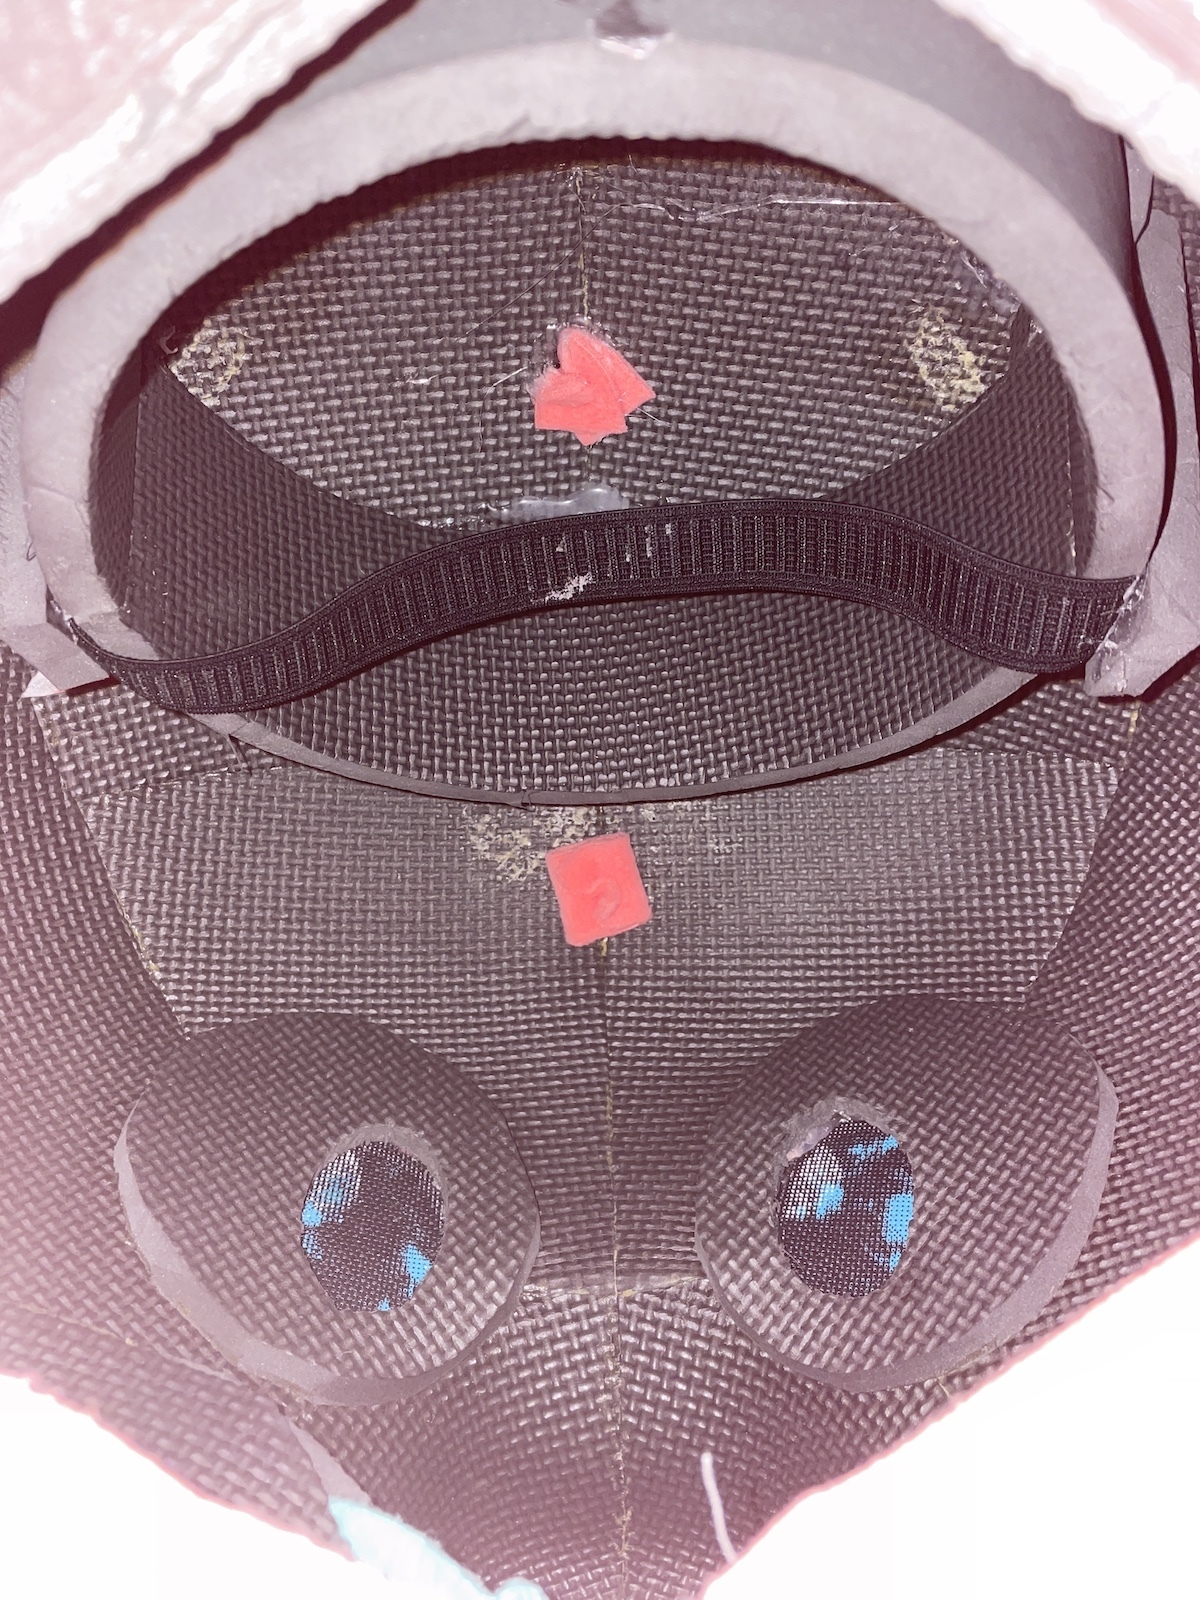
Next was to stabilize the head shape from the inside! I added a U-shaped chunk to the inside of the chin to pull it in slightly and to add an area for the tongue and teeth to sit. I also added two large circles to the insides of the eye sockets so the eyes would have somewhere to adhere to. I'd later cut out the foam around the area where the pupils would be for vision ports.
The head was also super roomy inside, so I'd need some way to stabilize it on my human head without it wobbling around like a bobble head. I crafted a headband out of EVA foam with an elastic chin strap, and glued that into the headbase.
Next I needed to pull the pattern from the finished head base to create the fleece 'skin', including the inside of the mouth. This is the same process as a traditional fursuit head, so if you are familiar with that this should be easy!
I transferred my tape pattern to fleece and pinned the cut out pieces to my head. I sewed it together and noted the places where it wasn't fitting as well as I'd like it to, as well as spots where I could move seams around or remove them entirely for a more seamless look in the final version of the pattern. This fleece has a lot of stretch to it, so it is a lot more forgiving when it comes to omitting darts and small seams.
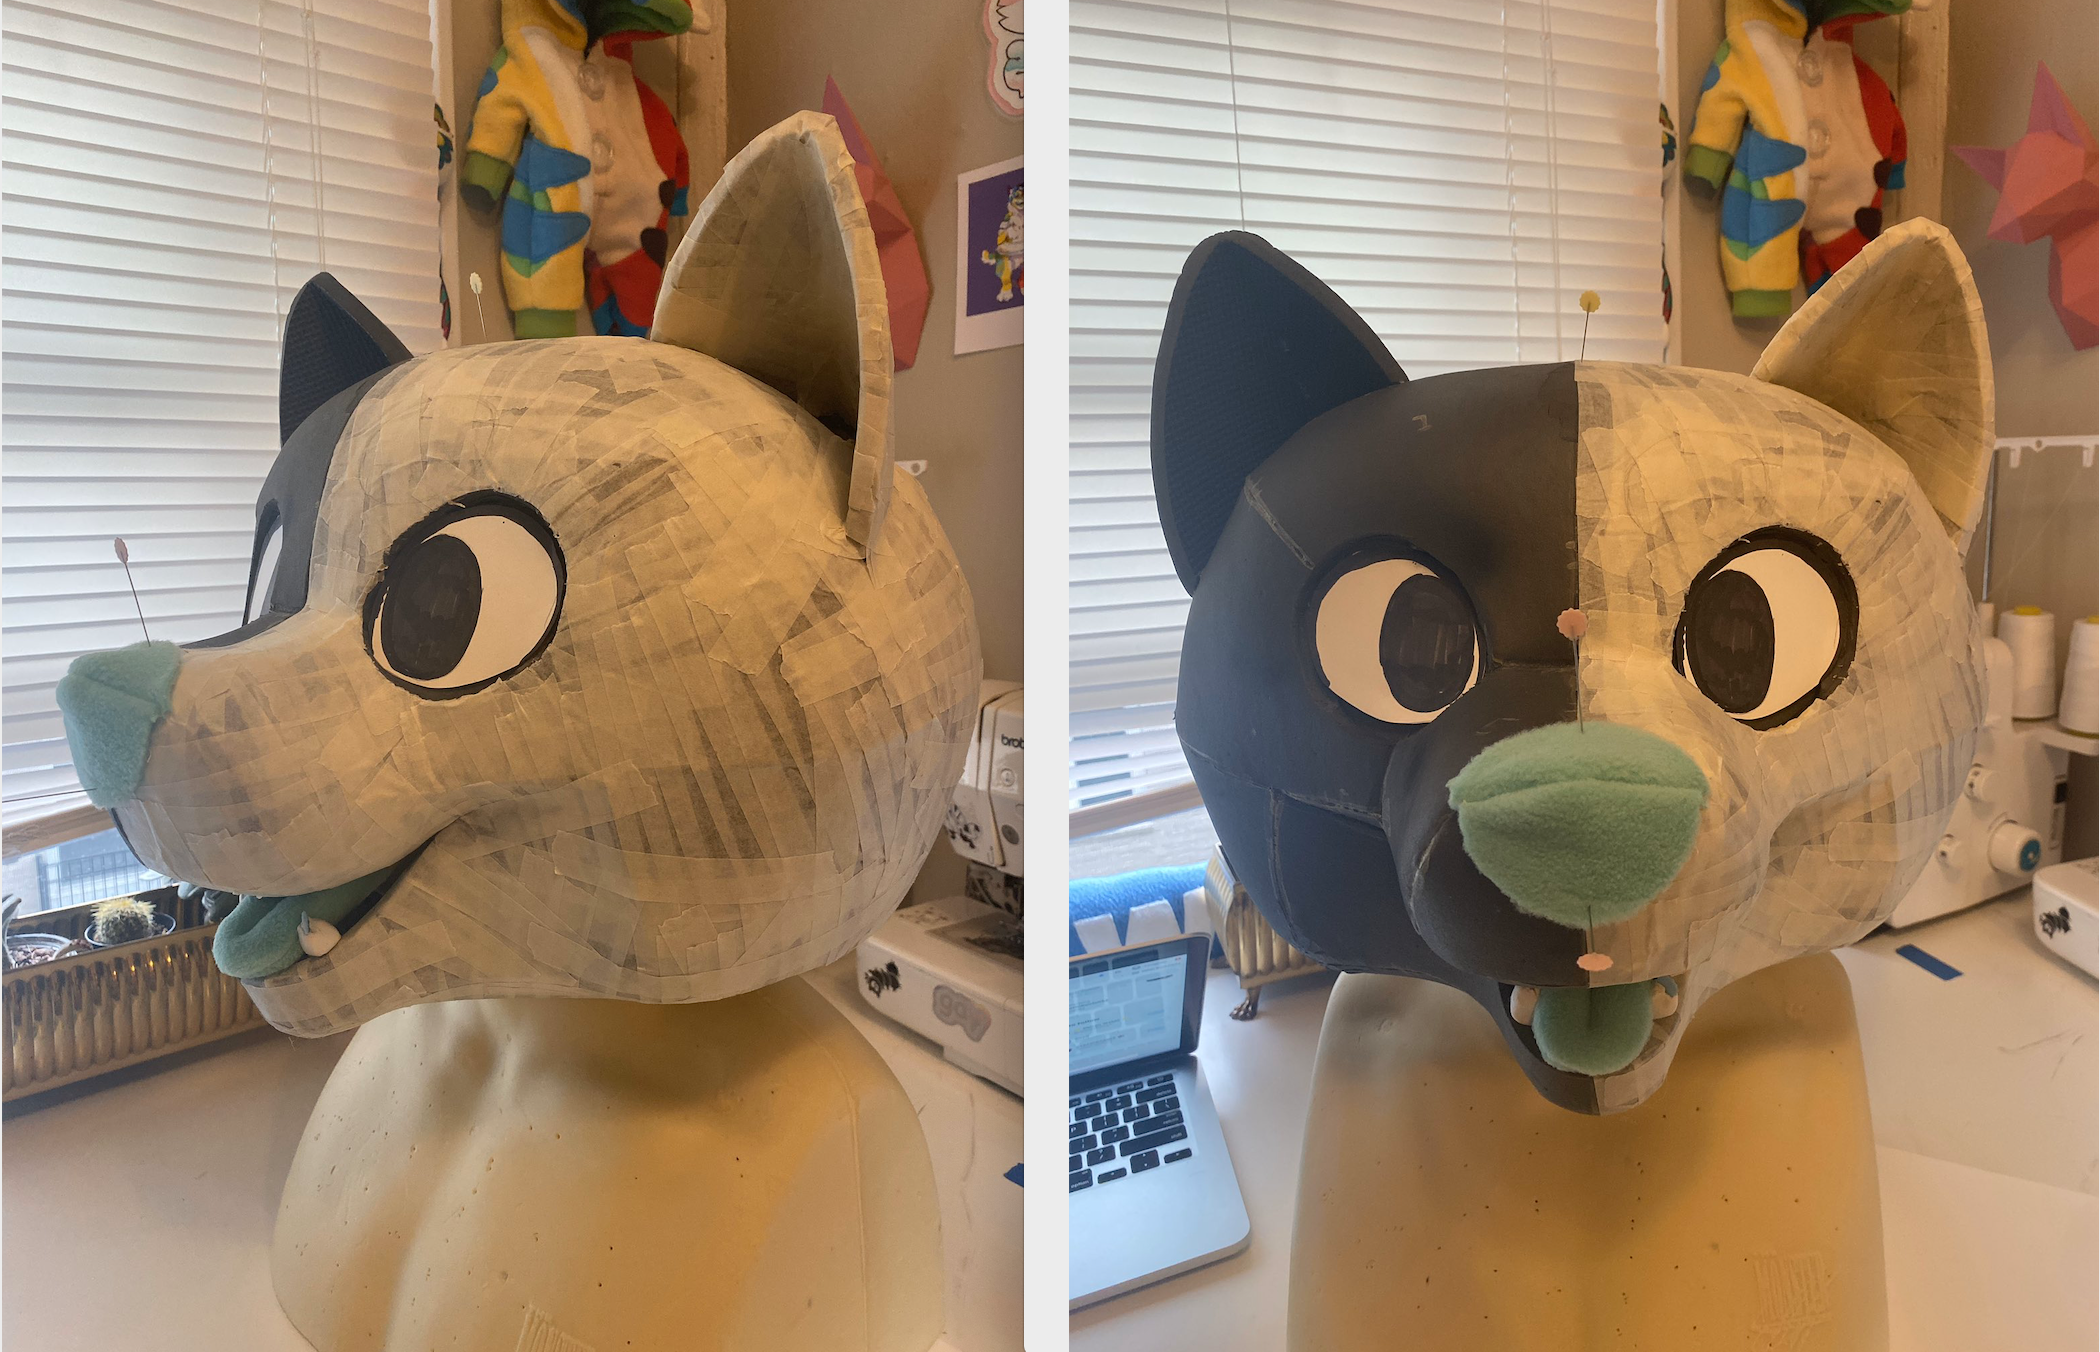
I knew that I wanted Soupy to be soft and squishy, and I also needed to even out the bumps and lumps left in the EVA foam pattern, so I coated the head in a layer of plush batting. I left the ears, snout, and chin clear so I could make sure those shapes remained accurate.
Using the first version of the fleece 'skin', I cut and marked the changes I wanted to make and used that as the pattern for the final version. I sewed it together in one big skin, including the inside of the mouth but omitting the ears, leaving a long seam in the back open.
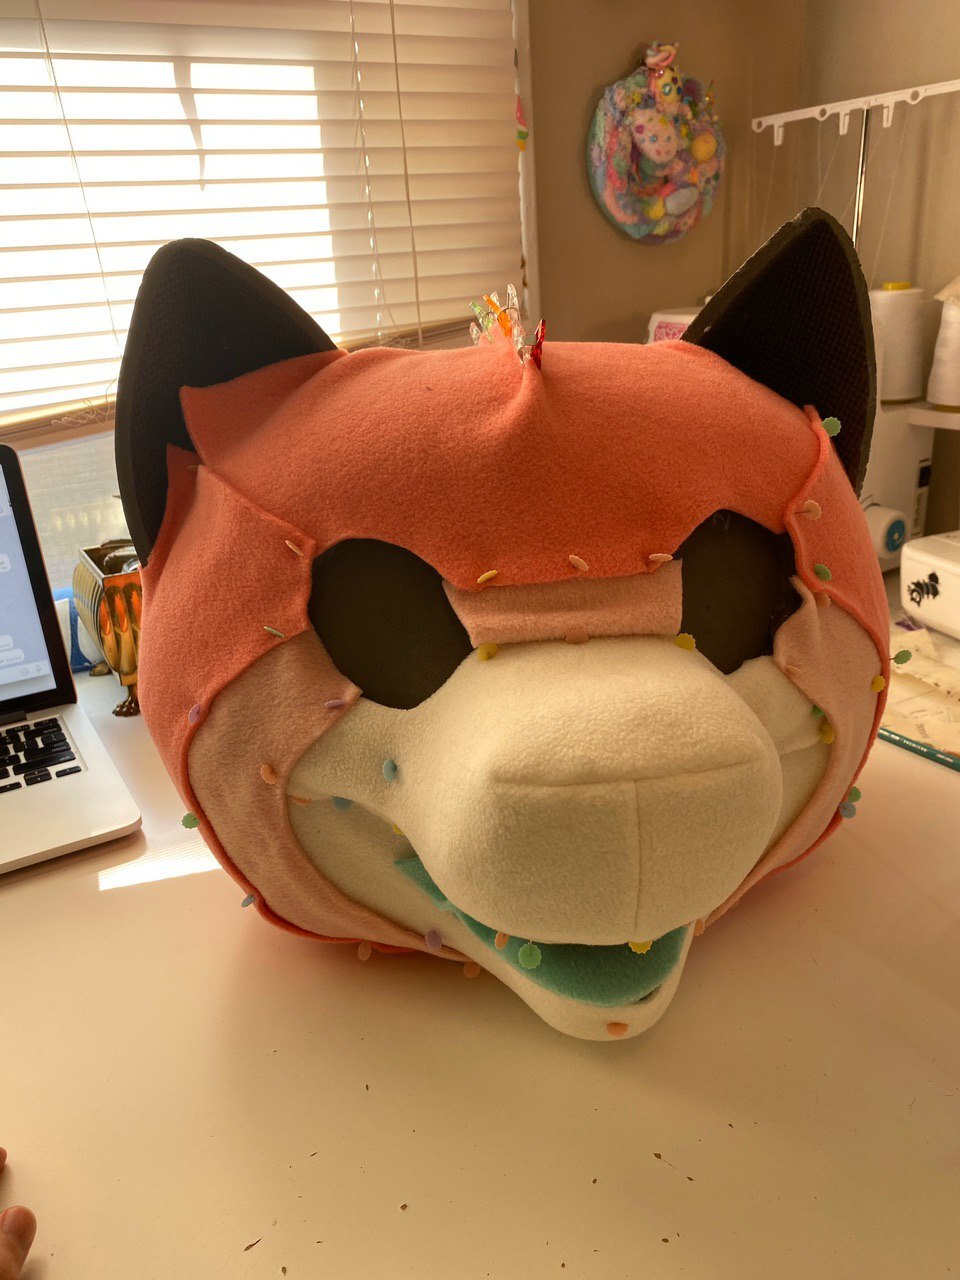
After pinning it on and making sure everything fit nicely over the batting, I carefully added glue to specific areas on the head such as the corners of the smile, around the eye sockets, around the lips on the muzzle and jaw, and the corner where the forehead meets the muzzle, starting at the tip of the nose and stretching the fleece tight as I went. Then I rolled the fleece back over the rest of the head and hand sewed the skin closed at the back.
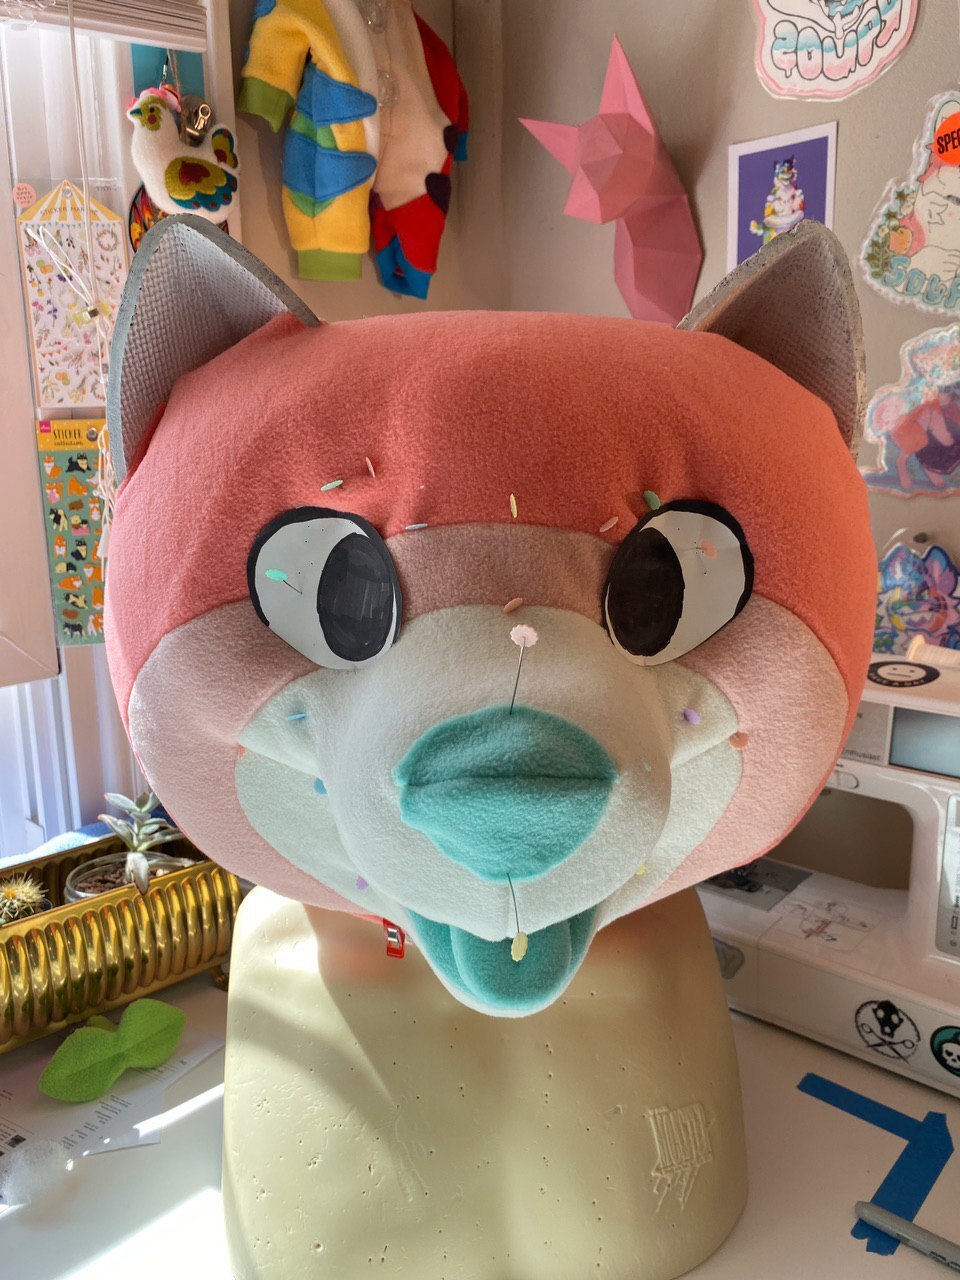
I made a few paper eye templates to decide which shape I liked, and then crafted the eyes out of our fursuit eye mesh and styrene plastic. (I have a separate tutorial for this here!) I carefully painted the lashline on with enamel model paints and sealed the whole thing with a glossy clear coat. I carefully glued them in, top stitched on the simple nose, and sewed the tongue to the fleece on the inside of the mouth.
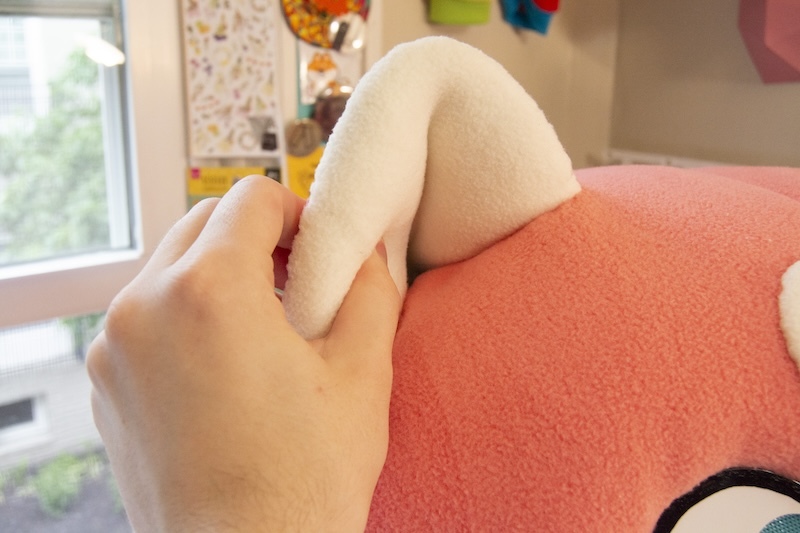
I pulled a quick tape pattern from the ears and transferred that to fleece and ladder-stitched it together, and then to the rest of the fleece base.

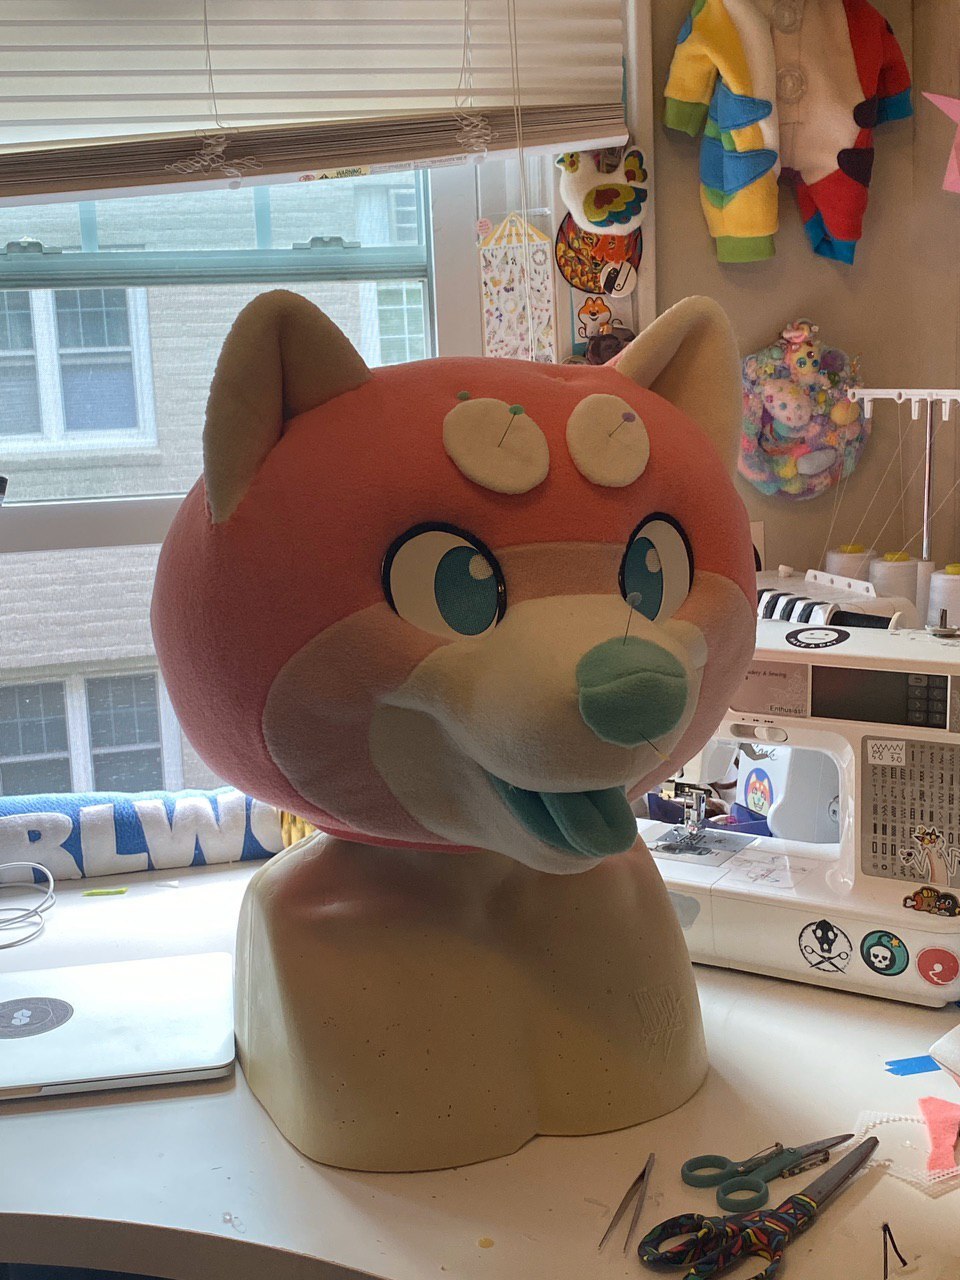
Almost done! Next, eyebrows! I created the eyebrows with two circles of leftover styrene with fleece stretched over them, then ladder-stitched them to the forehead.
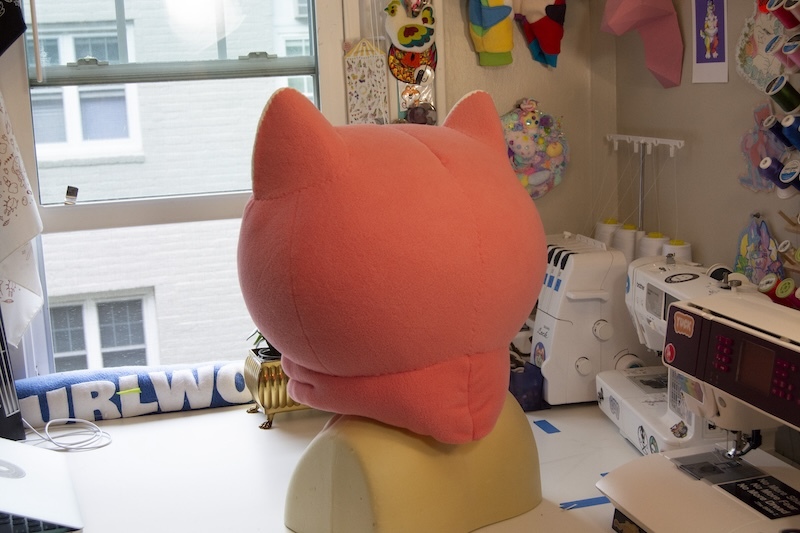
I wanted Soupy to have a funny thick and chunky shiba neck, so made a quick chunky plush stuffed neck and ladder stitched it to the bottom of the head.
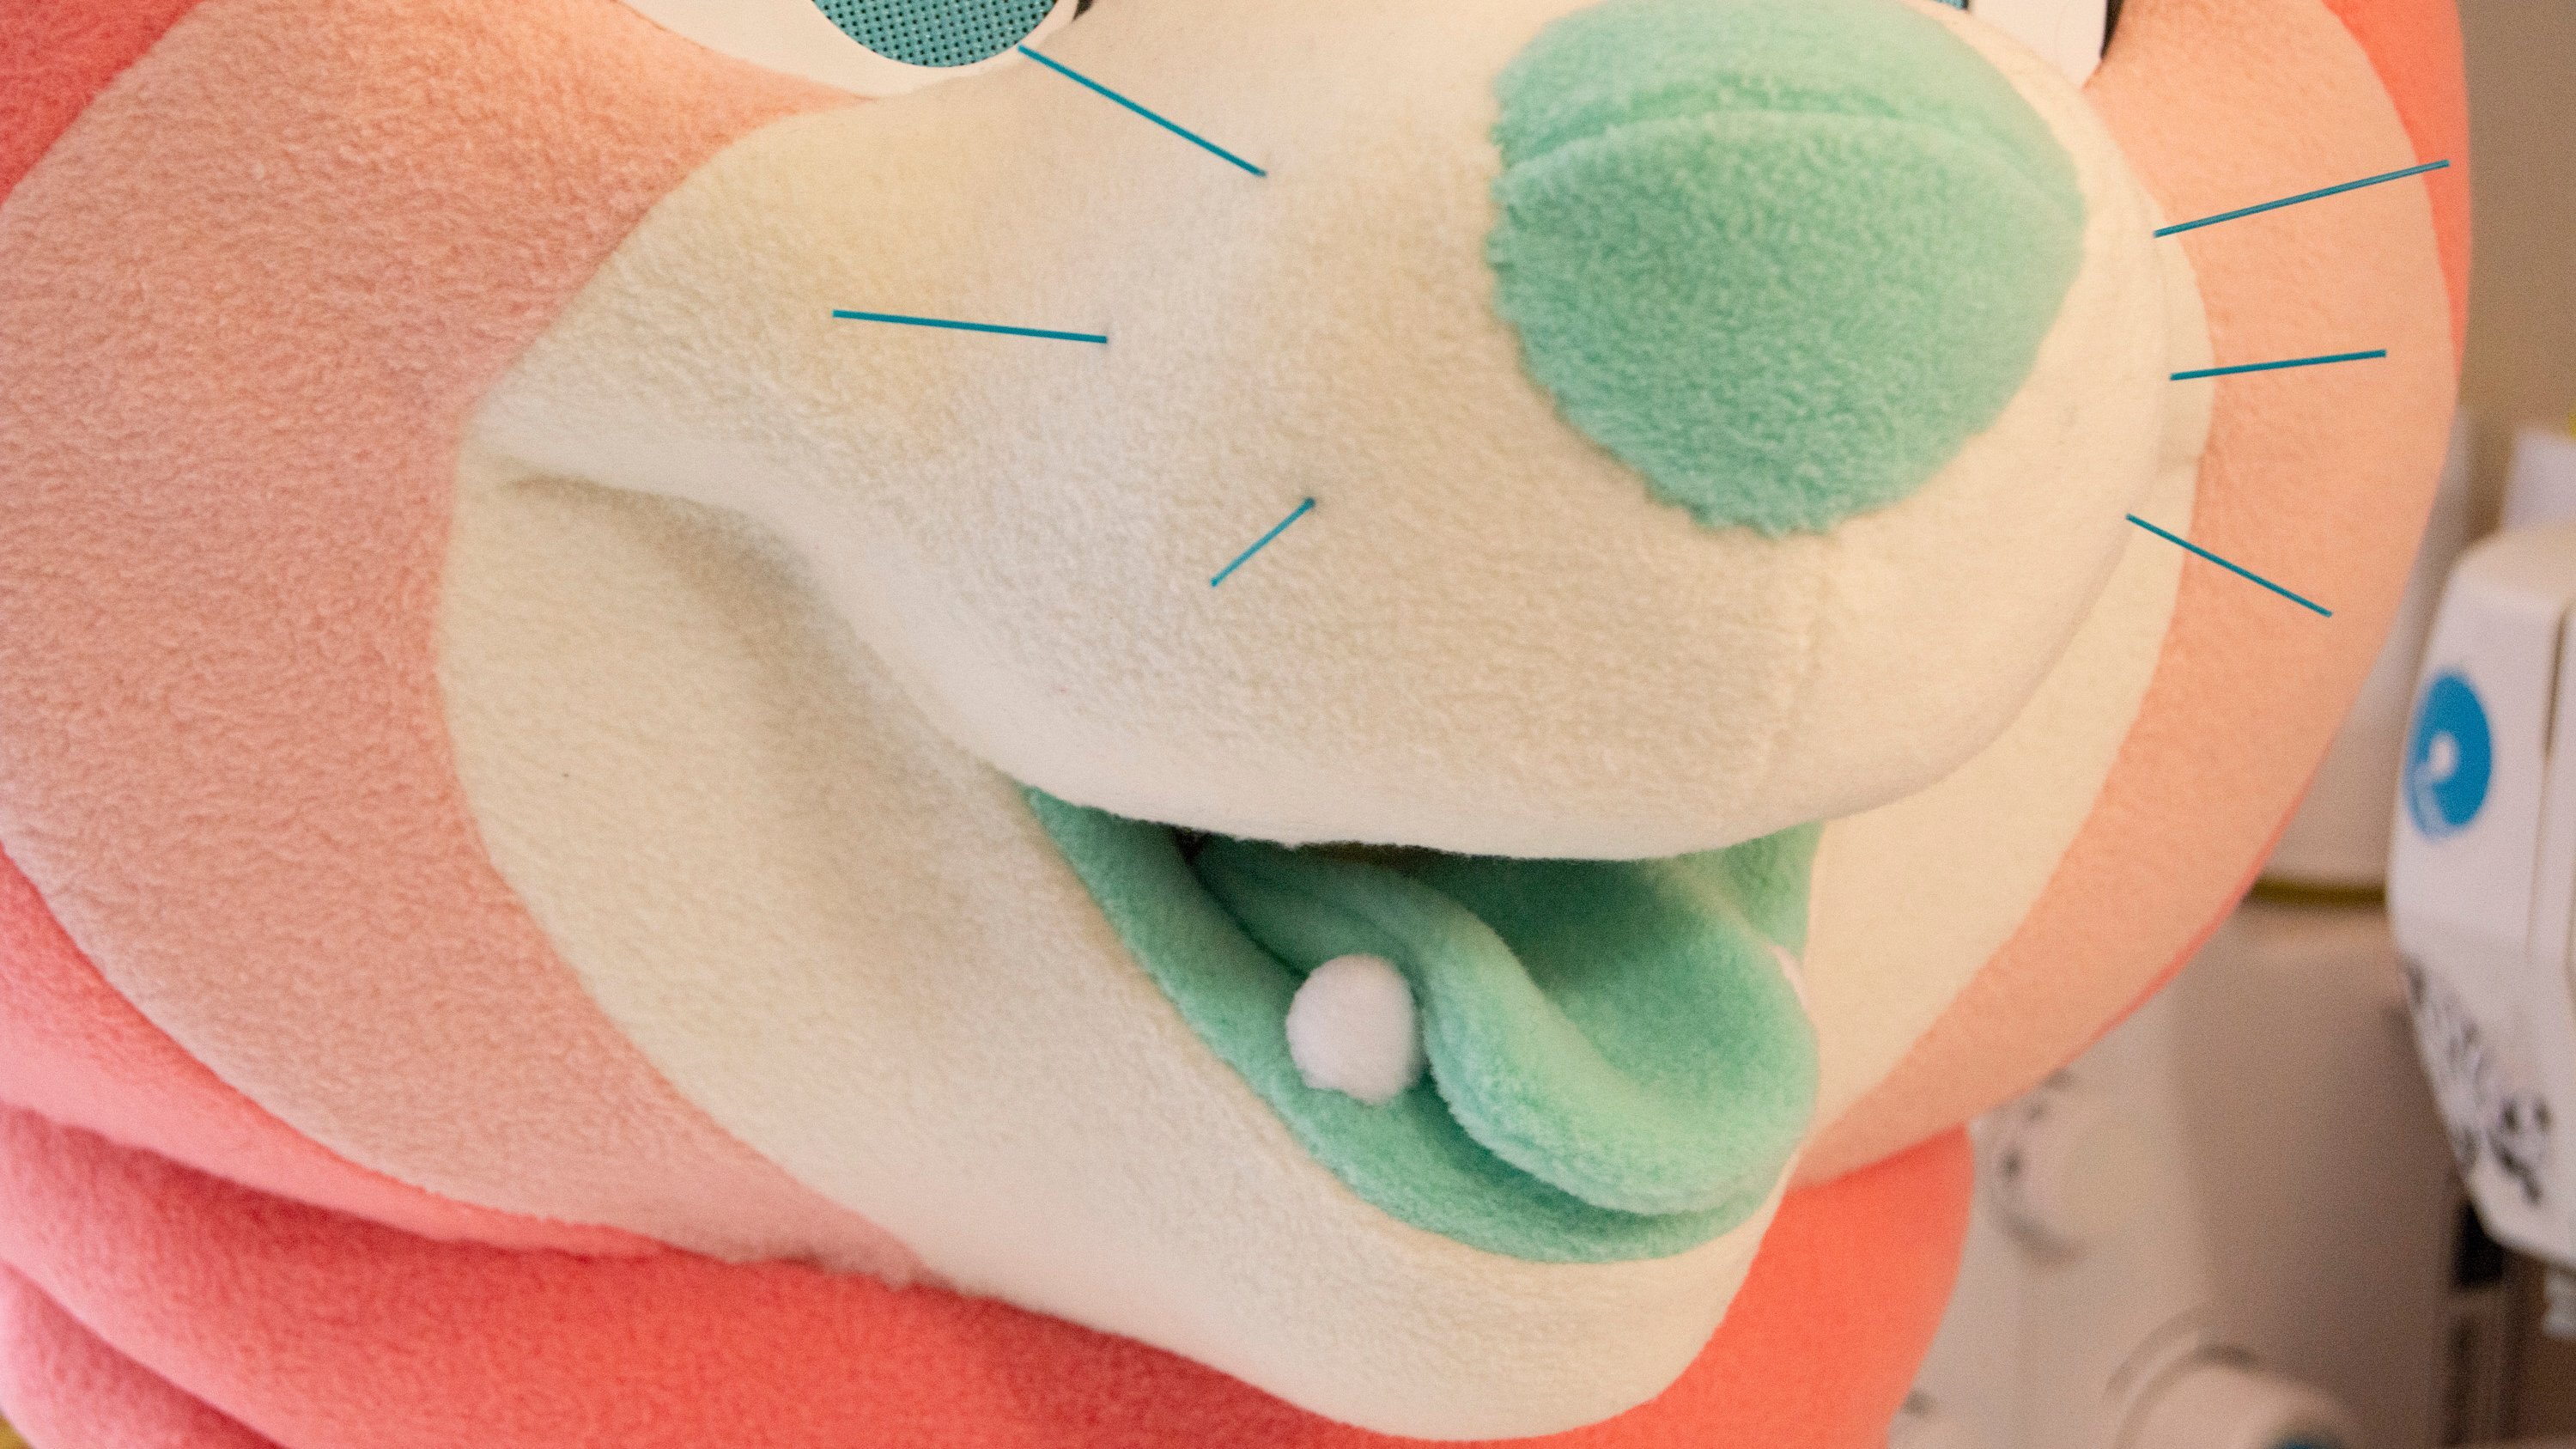
The final touch... whiskers! I purchased some beautiful teal whiskers from Matrices and cut the ends to a point to stab them thru the fleece and foam. I could glue them in place from the inside, but for now they sit loosely in the head so I can 'retract' them for travel.
And that's it!
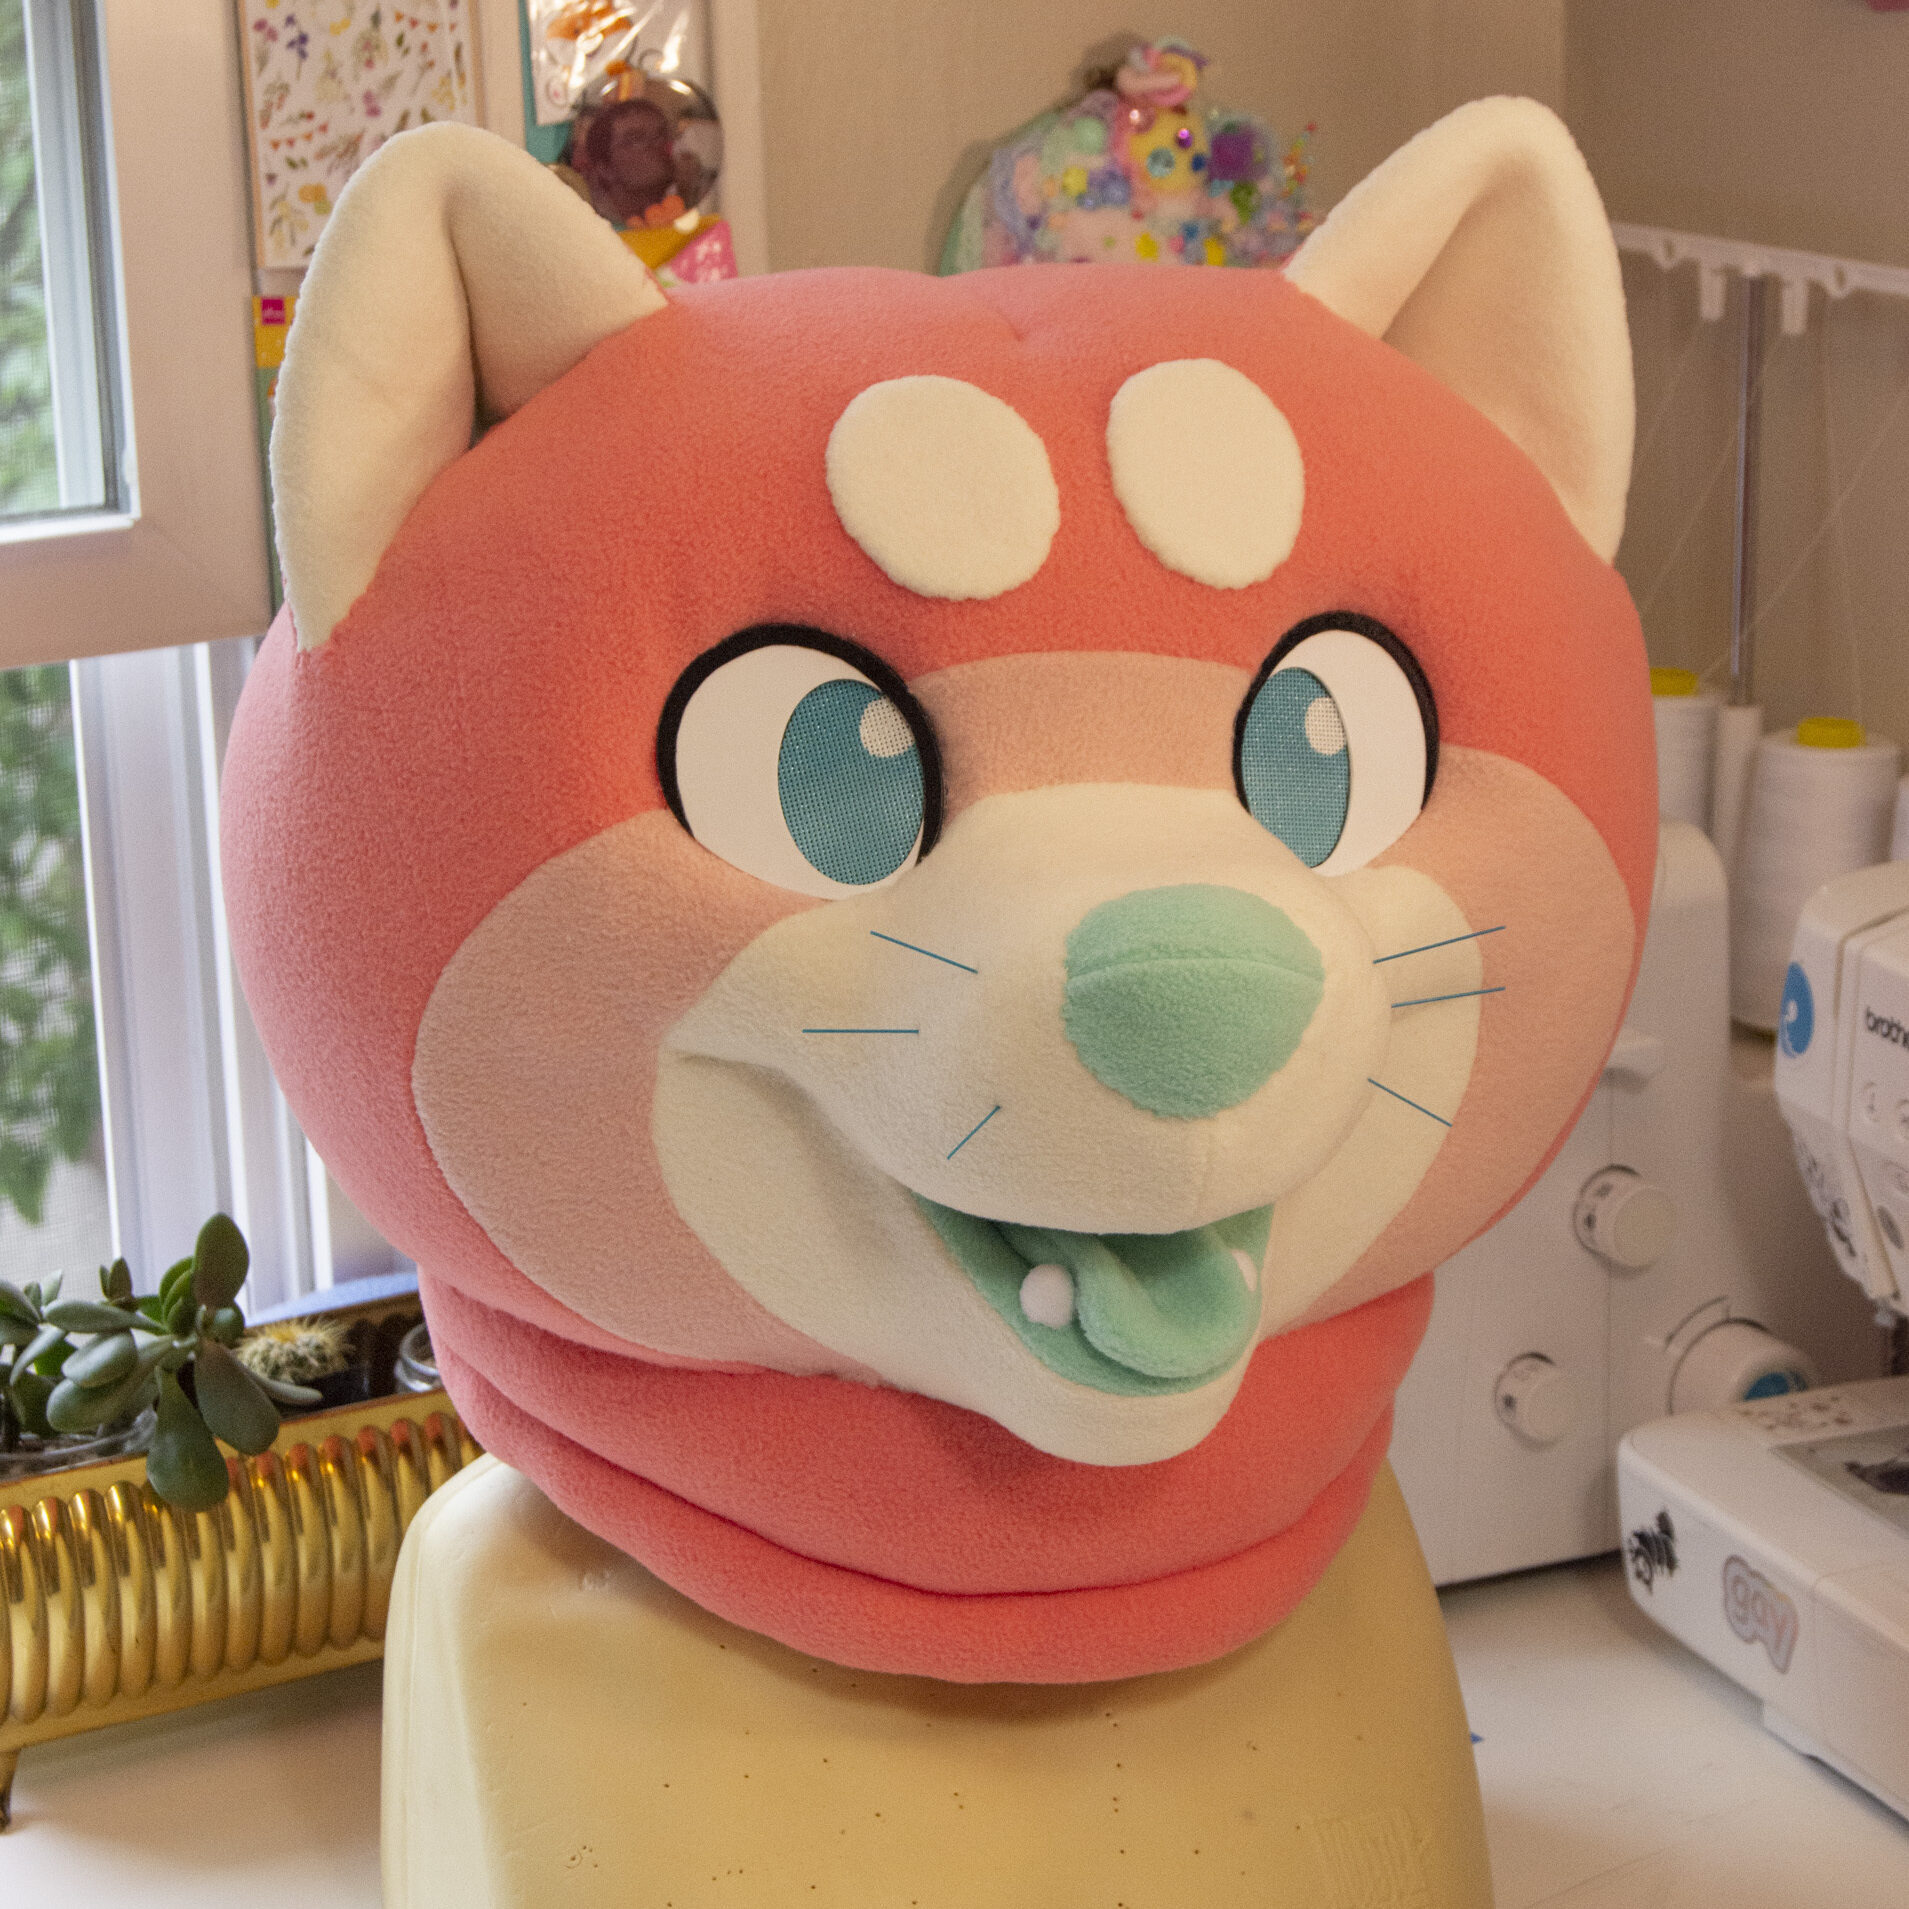
Soupy's done! Here are some lovely detail shots of all of his fun features :)
I hope that this was fun to read, and helpful to those of you who are interested in making your own critter! I cant wait to see the fun new animals and ideas you create. If you enjoyed this little peek into my process, consider supporting us thru our shop, or check out our Patreon where we share WIPS and goodies! Feel free to reach out with any questions, and thanks for joining me!